旧地址:http://blog.canself.com/wpftabcontrol/
在WPF中,想要改变TabControl的样子要比在Winform中方便很多,但往往也有很多种方式处理。
首先,我们进行常规的处理方式,下面介绍两种:
第一种是直接修改TabItem的样式,但其中会有一个问题,其效果不完整,因为默认模板中含有一些触发器影响,此处需要将模板中的触发器删除以此实现效果:
1
2
3
4
5
6
7
8
9
10
11
12
13
14
15
16
17
18
19
20
21
22
23
24
25
26
27
28
29
| <Style x:Key="TabItemStyle_Normal" TargetType="{x:Type TabItem}">
<Style.Triggers>
<Trigger Property="Selector.IsSelected" Value="True">
<Setter Property="Background" Value="Red"/>
</Trigger>
<Trigger Property="IsMouseOver" Value="True">
<Setter Property="Background" Value="Yellow"/>
</Trigger>
</Style.Triggers>
<Setter Property="Foreground" Value="Black"/>
<Setter Property="Padding" Value="6,1,6,1"/>
<Setter Property="BorderBrush" Value="#8C8E94"/>
<Setter Property="HorizontalContentAlignment" Value="Stretch"/>
<Setter Property="VerticalContentAlignment" Value="Stretch"/>
<Setter Property="Template">
<Setter.Value>
<ControlTemplate TargetType="{x:Type TabItem}">
<Grid SnapsToDevicePixels="true">
<Border x:Name="Bd" BorderBrush="{TemplateBinding BorderBrush}" BorderThickness="1,1,1,0" Background="{TemplateBinding Background}" Padding="{TemplateBinding Padding}">
<ContentPresenter x:Name="Content" ContentSource="Header" HorizontalAlignment="{Binding HorizontalContentAlignment, RelativeSource={RelativeSource AncestorType={x:Type ItemsControl}}}" RecognizesAccessKey="True" SnapsToDevicePixels="{TemplateBinding SnapsToDevicePixels}" VerticalAlignment="{Binding VerticalContentAlignment, RelativeSource={RelativeSource AncestorType={x:Type ItemsControl}}}"/>
</Border>
</Grid>
</ControlTemplate>
</Setter.Value>
</Setter>
<Setter Property="Height" Value="40"/>
<Setter Property="Width" Value="200"/>
<Setter Property="Background" Value="Blue"/>
</Style>
|
第二种是修改TabItem的模板,直接在其模板中添加触发器,此种处理方式在一般情况下更为合理
1
2
3
4
5
6
7
8
9
10
11
12
13
14
15
16
17
18
19
20
21
22
23
24
25
26
27
28
29
| <Style x:Key="TabItemStyle_Normal2" TargetType="{x:Type TabItem}">
<Setter Property="Foreground" Value="Black"/>
<Setter Property="Padding" Value="6,1,6,1"/>
<Setter Property="BorderBrush" Value="#8C8E94"/>
<Setter Property="HorizontalContentAlignment" Value="Stretch"/>
<Setter Property="VerticalContentAlignment" Value="Stretch"/>
<Setter Property="Template">
<Setter.Value>
<ControlTemplate TargetType="{x:Type TabItem}">
<Grid SnapsToDevicePixels="true">
<Border x:Name="Bd" BorderBrush="{TemplateBinding BorderBrush}" BorderThickness="1,1,1,0" Padding="{TemplateBinding Padding}" Background="Gray">
<ContentPresenter x:Name="Content" ContentSource="Header" HorizontalAlignment="{Binding HorizontalContentAlignment, RelativeSource={RelativeSource AncestorType={x:Type ItemsControl}}}" RecognizesAccessKey="True" SnapsToDevicePixels="{TemplateBinding SnapsToDevicePixels}" VerticalAlignment="{Binding VerticalContentAlignment, RelativeSource={RelativeSource AncestorType={x:Type ItemsControl}}}"/>
</Border>
</Grid>
<ControlTemplate.Triggers>
<Trigger Property="IsMouseOver" Value="true">
<Setter Property="Background" TargetName="Bd" Value="LightYellow"/>
</Trigger>
<Trigger Property="IsSelected" Value="true">
<Setter Property="Panel.ZIndex" Value="1"/>
<Setter Property="Background" TargetName="Bd" Value="LightBlue"/>
</Trigger>
</ControlTemplate.Triggers>
</ControlTemplate>
</Setter.Value>
</Setter>
<Setter Property="Height" Value="50"/>
<Setter Property="Width" Value="200"/>
</Style>
|
使用:
1
2
3
4
5
6
7
8
9
10
11
12
13
14
| <TabControl TabStripPlacement="Left" BorderThickness="1,1,5,1">
<TabItem Header="常规1" Style="{DynamicResource TabItemStyle_Normal}">
<Grid Background="#FFE5E5E5"/>
</TabItem>
<TabItem Header="常规2" Style="{DynamicResource TabItemStyle_Normal}">
<Grid Background="#FFE5E5E5"/>
</TabItem>
<TabItem Header="常规3" Style="{DynamicResource TabItemStyle_Normal2}" >
<Grid Background="#FFE5E5E5"/>
</TabItem>
<TabItem Header="常规4" Style="{DynamicResource TabItemStyle_Normal2}" >
<Grid Background="#FFE5E5E5"/>
</TabItem>
</TabControl>
|
然而,工作中总有一些情况用常规方式解决会比较繁琐,因此有以下特殊方法。
使用情况:每一个TabItem样式都不一样,如美工出图直接将文字保留在图上。常规方式就必须一个TabItem一个样式,使用特殊方法的话,可以只使用一个样式。
1
2
3
4
5
6
7
8
9
10
11
12
13
14
15
16
17
18
19
20
21
22
23
24
25
26
27
28
29
30
31
32
33
34
35
36
37
38
39
40
41
42
43
44
45
| <Style x:Key="TabItemStyle_Special" TargetType="{x:Type TabItem}">
<Setter Property="Foreground" Value="Black"/>
<Setter Property="Padding" Value="6,1,6,1"/>
<Setter Property="BorderBrush" Value="#8C8E94"/>
<Setter Property="HorizontalContentAlignment" Value="Stretch"/>
<Setter Property="VerticalContentAlignment" Value="Stretch"/>
<Setter Property="Template">
<Setter.Value>
<ControlTemplate TargetType="{x:Type TabItem}">
<Grid SnapsToDevicePixels="true">
<Border x:Name="first" BorderBrush="{TemplateBinding BorderBrush}" BorderThickness="1,1,1,0" Background="{TemplateBinding Background}" Padding="{TemplateBinding Padding}" Visibility="Visible">
<TextBlock x:Name="Content1" HorizontalAlignment="{Binding HorizontalContentAlignment, RelativeSource={RelativeSource AncestorType={x:Type ItemsControl}}}" SnapsToDevicePixels="{TemplateBinding SnapsToDevicePixels}" VerticalAlignment="{Binding VerticalContentAlignment, RelativeSource={RelativeSource AncestorType={x:Type ItemsControl}}}" Text="{TemplateBinding Header}" Foreground="White"/>
</Border>
<Border x:Name="second" BorderBrush="{TemplateBinding BorderBrush}" BorderThickness="1,1,1,0" Background="{TemplateBinding Foreground}" Padding="{TemplateBinding Padding}" Visibility="Collapsed">
<TextBlock x:Name="Content2" HorizontalAlignment="{Binding HorizontalContentAlignment, RelativeSource={RelativeSource AncestorType={x:Type ItemsControl}}}" SnapsToDevicePixels="{TemplateBinding SnapsToDevicePixels}" VerticalAlignment="{Binding VerticalContentAlignment, RelativeSource={RelativeSource AncestorType={x:Type ItemsControl}}}" Text="{TemplateBinding Header}" Foreground="White"/>
</Border>
</Grid>
<ControlTemplate.Triggers>
<Trigger Property="IsMouseOver" Value="true">
<Setter Property="Background" TargetName="first">
<Setter.Value>
<LinearGradientBrush EndPoint="0,1" StartPoint="0,0">
<GradientStop Color="#EAF6FD" Offset="0.15"/>
<GradientStop Color="#D9F0FC" Offset=".5"/>
<GradientStop Color="#BEE6FD" Offset=".5"/>
<GradientStop Color="#A7D9F5" Offset="1"/>
</LinearGradientBrush>
</Setter.Value>
</Setter>
<Setter Property="Visibility" TargetName="first" Value="Collapsed"/>
<Setter Property="Visibility" TargetName="second" Value="Visible"/>
</Trigger>
<Trigger Property="IsSelected" Value="true">
<Setter Property="Panel.ZIndex" Value="1"/>
<Setter Property="Background" TargetName="first" Value="#F9F9F9"/>
<Setter Property="Visibility" TargetName="first" Value="Collapsed"/>
<Setter Property="Visibility" TargetName="second" Value="Visible"/>
</Trigger>
</ControlTemplate.Triggers>
</ControlTemplate>
</Setter.Value>
</Setter>
<Setter Property="Height" Value="50"/>
<Setter Property="Width" Value="200"/>
</Style>
|
使用:
1
2
3
4
5
6
7
8
| <TabControl Grid.Column="1" TabStripPlacement="Right" BorderThickness="5,1,1,1">
<TabItem Header="特殊1" Style="{DynamicResource TabItemStyle_Special}" Background="Blue" Foreground="Green">
<Grid Background="#FFE5E5E5"/>
</TabItem>
<TabItem Header="特殊2" Style="{DynamicResource TabItemStyle_Special}" Background="Yellow" Foreground="Red">
<Grid Background="#FFE5E5E5"/>
</TabItem>
</TabControl>
|
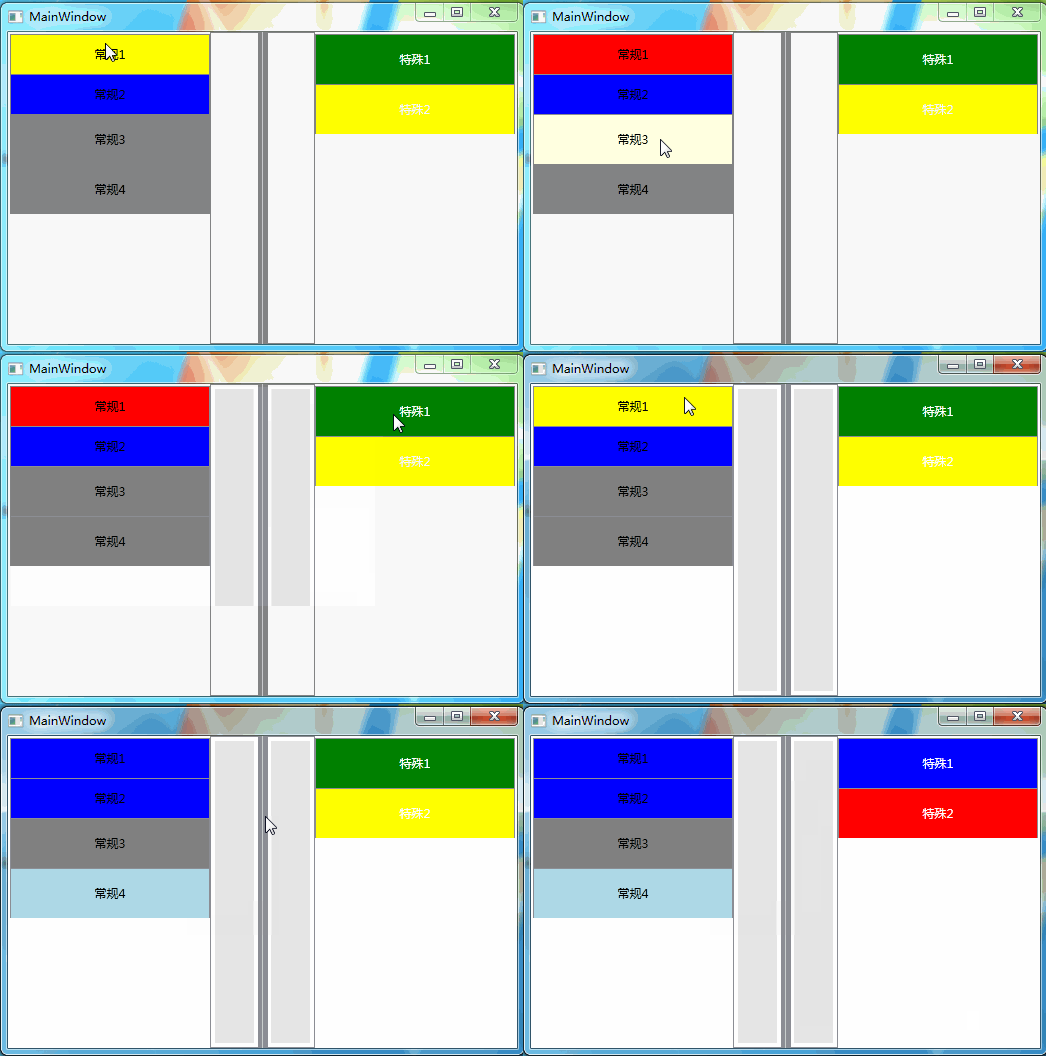
下图是测试结果图:其中常规1、2使用样式修改;常规3、4使用模板修改;特殊1、2为特殊方式处理。其中包含两个效果【MouseOver和Selected】